Aurora Heritage Planning
Follow us:


If you live in a conservation area, you’ll already know it’s both a blessing and a challenge. You enjoy historic charm and character – but strict planning controls can make even small changes feel complicated.
The truth is, many planning applications fail because homeowners or developers don’t understand the additional requirements councils expect. This can lead to costly delays, redesigns, or outright refusals.
In this guide, our team at Aurora Heritage Planning – specialists in conservation and heritage planning – share a simple step-by-step process to help you secure planning permission in a conservation area. You’ll learn how to avoid common pitfalls, prepare stronger applications, and get expert support along the way.
Why Conservation Areas Matter
Conservation areas are designated to protect places of special architectural or historic interest. Councils are particularly cautious about changes that could alter their character – from large extensions to seemingly small alterations like new windows or external finishes.
Under the National Planning Policy Framework (NPPF), local authorities must consider the impact of proposals on the “significance of heritage assets”, which includes conservation areas. The goal isn’t to freeze areas in time, but to manage change sensitively.
👉 Tip: This is where heritage planning consultants like Aurora can help. We ensure your project is designed and documented in a way that meets council expectations from the start.
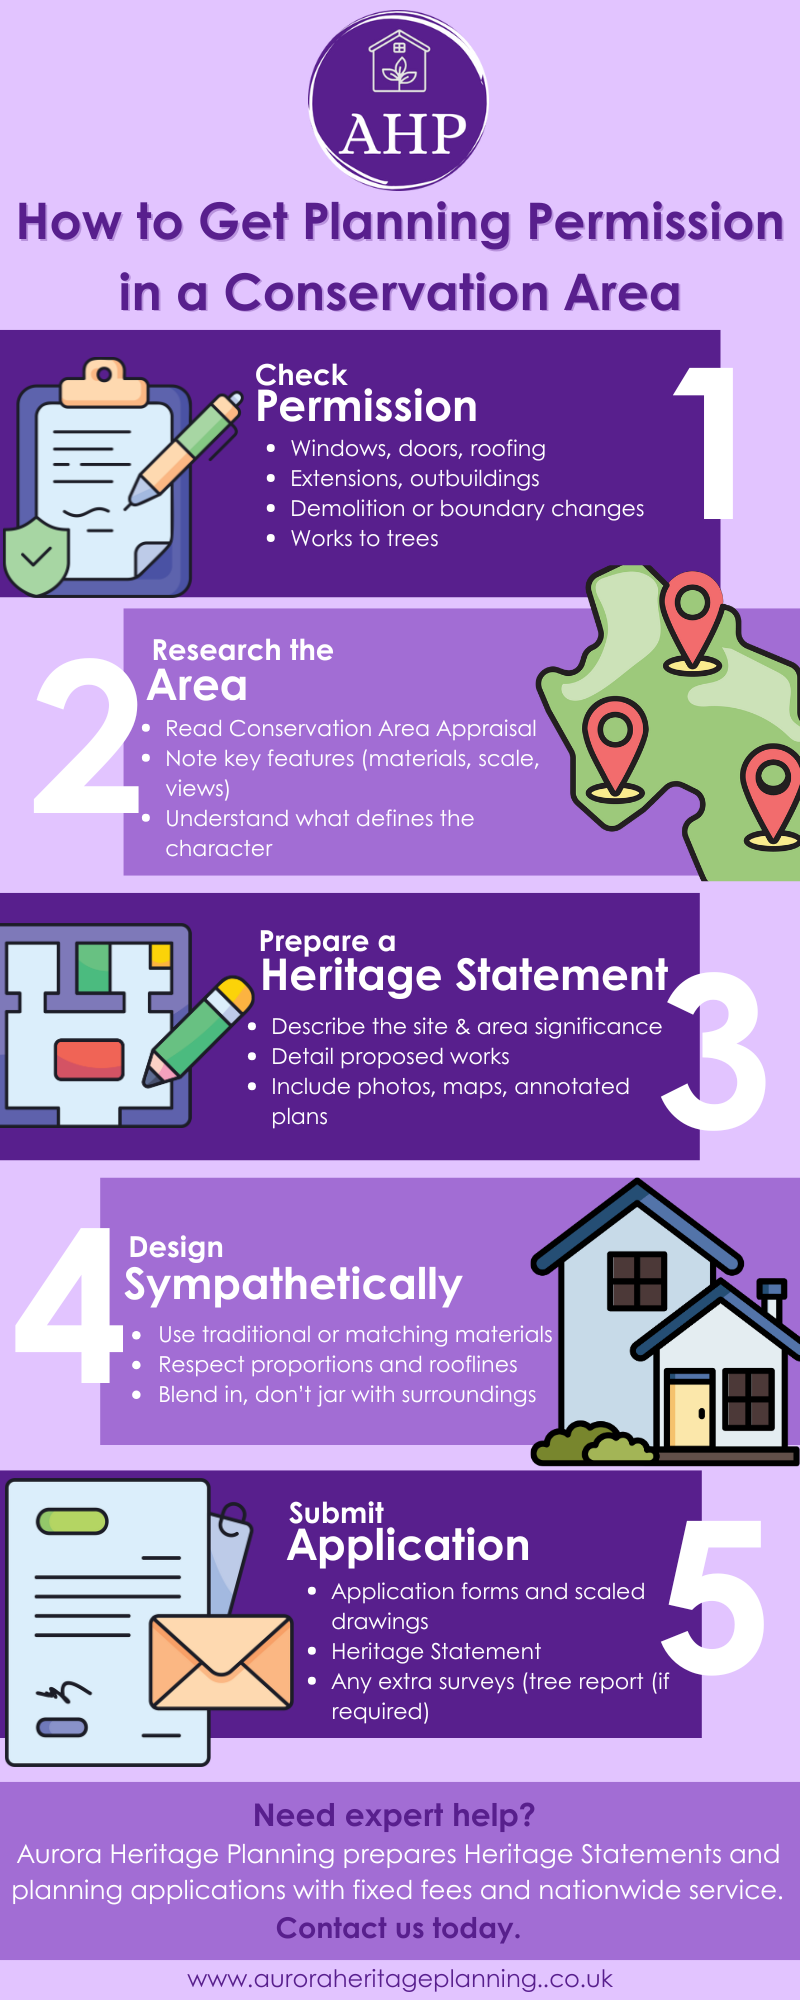
Step 1: Do You Need Planning Permission in a Conservation Area?
Not all work requires permission, but rules are much stricter in conservation areas. Common projects that may require consent include:
👉 Tip: Don’t assume your project is exempt. “Permitted development” rights are often restricted in conservation areas. Check with your local council or ask Aurora for advice before starting.
Step 2: Research the Character of the Conservation Area
A strong application shows you understand the setting. Before drawing up plans:
This context forms the foundation for your application and proves your design respects the area.
Step 3: Prepare a Heritage Statement (or Heritage Impact Assessment)
Most applications in conservation areas require a Heritage Statement.
👉 Tip: Supporting visuals (maps, photos, annotated plans) make your case stronger. Aurora’s team prepares professional heritage statements that give your project the best chance of approval.
Step 4: Use Sympathetic Designs and Materials
Design choices are closely scrutinised in conservation areas. To boost your chances:
Step 5: Submit a Strong Application
When you’re ready to apply (via the Planning Portal or your local council), make sure you include:
👉 Tip: A clear, professional submission reduces back-and-forth with planning officers – and Aurora can prepare the full package for
Step 6: Be Ready for Consultation
Once submitted, your application will go through a consultation process. Local groups, councillors, and neighbours may comment.
Aurora’s Perspective: Planning Made Simple
At Aurora Heritage Planning, we know how overwhelming conservation area rules can feel. Our role is to make the process straightforward and stress-free.
Whether it’s a small alteration or a larger redevelopment, our supportive team will guide you every step of the way – preparing the right documentation, liaising with councils, and helping you avoid costly mistakes.
Quick Checklist for Success
✔ Confirm if your works need permission
✔ Research your conservation area’s character
✔ Prepare a professional Heritage Statement
✔ Use sympathetic designs and materials
✔ Submit a complete, well-documented application
✔ Engage positively during consultation
Ready to Get Started?
Don’t risk delays or refusals. Aurora Heritage Planning can prepare clear, persuasive documentation that gives your project the best chance of approval.
👉 Contact us today for a fixed-fee quote and expert support with your conservation area planning application.
This privacy policy applies between you, the User of this Website and Aurora Heritage Planning Ltd, the owner and provider of this Website. Aurora Heritage Planning Ltd takes the privacy of your information very seriously. This privacy policy applies to our use of any and all Data collected by us or provided by you in relation to your use of the Website.
Please read this privacy policy carefully.
Definitions and interpretation
Data
collectively all information that you submit to Aurora Heritage Planning Ltd via the Website. This definition incorporates, where applicable, the definitions provided in the Data Protection Laws;
Cookies
a small text file placed on your computer by this Website when you visit certain parts of the Website and/or when you use certain features of the Website. Details of the cookies used by this Website are set out in the clause below (Cookies);
Data Protection Laws
any applicable law relating to the processing of personal Data, including but not limited to the Directive 96/46/EC (Data Protection Directive) or the GDPR, and any national implementing laws, regulations and secondary legislation, for as long as the GDPR is effective in the UK;
GDPR
the General Data Protection Regulation (EU) 2016/679;
Aurora Heritage Planning Ltd, or us Aurora Heritage Planning Ltd, a company incorporated in England and Wales whose registered office is at Hull.
UK and EU Cookie Law
the Privacy and Electronic Communications (EC Directive) Regulations 2003 as amended by the Privacy and Electronxic Communications (EC Directive) (Amendment) Regulations 2011;
User or you
any third party that accesses the Website and is not either (i) employed by Aurora Heritage Planning Ltd and acting in the course of their employment or (ii) engaged as a consultant or otherwise providing services to Aurora Heritage Planning Ltd and accessing the Website in connection with the provision of such services; and
Website
the website that you are currently using, auroraheritageplanning.co.uk, and any sub-domains of this site unless expressly excluded by their own terms and conditions.
Scope of this privacy policy
Data collected
How we collect Data
Data that is given to us by you
in each case, in accordance with this privacy policy.
Data that is received from third parties
Data that is received from publicly available third parties sources
Data that is collected automatically
Our use of Data
in each case, in accordance with this privacy policy.
Who we share Data with
in each case, in accordance with this privacy policy.
Keeping Data secure
Data retention
Your rights
Transfers outside the European Economic Area
Links to other websites
Changes of business ownership and control
Cookies
Type of Cookie
Purpose
Analytical/performance cookies
They allow us to recognise and count the number of visitors and to see how visitors move around our website when they are using it. This helps us to improve the way our website works, for example, by ensuring that users are finding what they are looking for easily.
General
Changes to this privacy policy
You may contact Aurora Heritage Planning Ltd via the Contact page.
5 February 2024
.svg)


.svg)
.svg)